Introduction
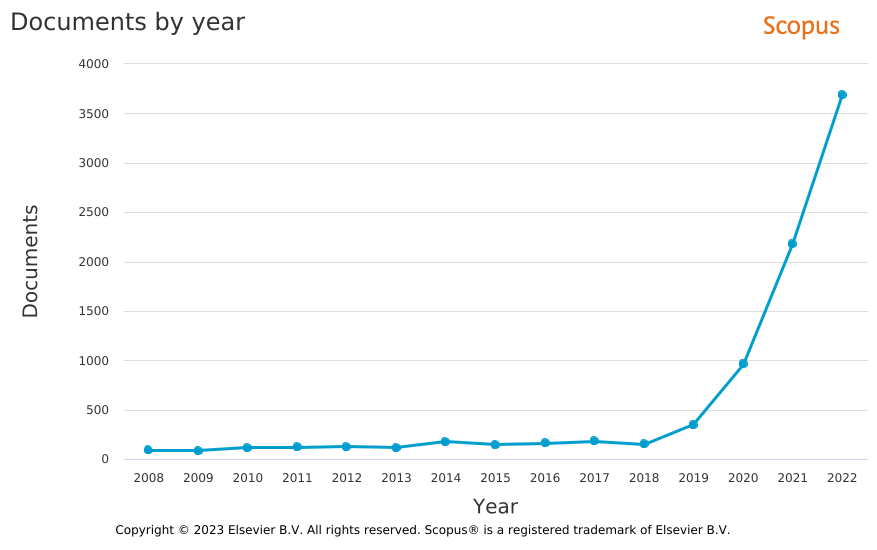
Federated Analysis (FA) has received rapidly increasing attention over the last three years in the scientific literature (Figure 1). It describes the centralized analysis of de-centralized databases while preserving the privacy of personal data. FA was proposed for the identification of rare adverse events in international post-marketing studies to overcome legal barriers [1]. This tutorial describes the installation of an FA client-server architecture and federated analysis of medical data using the DataSHIELD software [2] using virtualized images based on Docker [6] technology.
Alternative open-source software, e.g. Owkin’s Substra [35, 36], VANTAGE6 [38], or OpenSAFELY [37], the secure analytics platform for NHS electronic health records, exists.
Note: The tutorial has been tested by installing and using two federated analysis servers at https://srv1.fedana.cloud and https://srv2.fedana.cloud.
Objective
The overall objective of this tutorial is to lower the technical barrier of building a Federated Analysis system and performing Federated Analysis. The installation and integration of independent components of this complex software stack requires advanced system administrator/IT architect skills and a substantial commitment in time and energy. The documentation of the various technical concepts and software components is comprehensive and not always consistent, up-to-date or applicable to the specific issues a user may experience. Therefore, this tutorial presents an easy method of building a Federated Analysis system using readily available software images.
Background
The DataSHIELD [2] software is a component of the OBiBa [3] software suite which supports the entire data management lifecycle including collection, integration, harmonization, sharing, and analysis of data. DataSHIELD is a multi-component client-server software architecture including a data warehouse (OPAL or Armadillo), relational databases (MangoDB, MySQL/MariaDB, or Postgres), and a statistical analysis system (R).
Install DataSHIELD
Overview
There are multiple alternatives to install software of the DataSHIELD software in particular and the OBiBa software suite in general [10]:
- Method 1: Installation of independent software components and all dependencies and manually configuring them to integrate them with each other:
- Pros: educational
- Cons: time-consuming, error-prone
- Method 2: Installation of virtual images of (sets of) software using DOCKER [6]
- Pros: quick, easy, stable
- Cons: another software tool to learn, additional level of complexity, eg when configuring the webserver
- Method 3: Automatic, scripted installation of (virtualized) bundles of software using deployment tools, such as PUPPET (outdated!) [8] or CORAL [15, 16]
- Pros: replicable, scalable administration and configuration of larger software stacks (“docker swarms”) on multiple servers (“infrastructure as code”, [9])
- Cons: another software tool to learn, additional level of complexity, ineffective for single servers
For the installation of the DataSHIELD software, we will follow Method 2 (“Installation of virtual images of (sets of) software using DOCKER”) in this tutorial, since it seems best for the installation of a small set of software components on a single server.
For the installation of the complete OBiBa software suite, we recommend Method 3 (“Automatic, scripted installation of (virtualized) bundles of software using deployment tools”), which installs a swarm of Docker images using the CORAL [15, 16] Docker stack deployment approach.
In the following tutorial, the installation and analysis of a DataSHIELD is described for a specific cloud provider (hetzner.com) and a specific domain name provider (namecheap.com) with a level of detail which should allow a successful installation without problems. You may deviate from this default setup as you think appropriate but you will have to live with the consequences ;-). Technical understanding is helpful, but is not strictly necessary if you follow the instructions and you feel bold enough to install Linux packages (ie using the apt tool) and can edit text files with the preinstalled text editors (eg pico or nano).
The installation of the DataSHIELD software may require additional support beyond this tutorial. The following resources are recommended:
- Documentation of the data warehouse OPAL (including all sub-components) [4]
- Discussion forum for DataSHIELD [5] (incl DataSHIELD developers providing answers within 1-2 days)
Create cloud server
Create an account at https://hetzner.com .
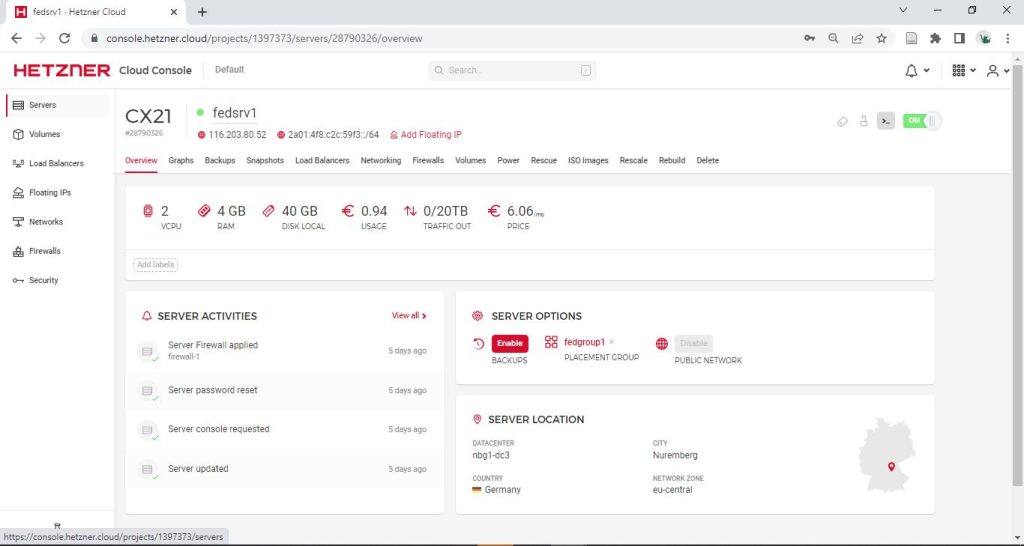
Figure 2: Web interface to manage cloud server at cloud service provider hetzner.com
Web GUI:
HETZNER > Cloud Console > Projects > MyProject > Servers > Add Server with the following configs
(cf Figure 2):
- Configuration of HETZNER, CX21 server:
- Location: eu-central
- Image: Debian 11
- Type: Standard, CX21
- 2 virtual CPUs (Intel)
- 4GB Memory
- 40GB Storage
- Networking: IPv4, IPv6
- SSH keys: none
- Volumes: none
- Firewalls: none (define later, see below)
- Backups: none
- Placement group: create “FedAnaGroup”
- Labels: skip
- Cloud config: skip
- Labels: skip
- Name: fedsrv1 (or what you want)
- Costs around 6EUR/Month
Notes:
- Memory with 4GB should be enough for testing, but is considered a minimum to run the complete software stack on one server. An R (Rock server) can use a lot of memory depending on the performed analysis which will then block access to the OPAL admin web page. Therefore, for intensive analysis it is recommended 1) to increase memory, e.g. to 8GB, 2) to use the resourcer package for indirect data access using less memory or 3) to connect to another remote R (Rock) server (without OPAL, since an R server should be linked to one OPAL server only).
- You can upgrade your cloud server to a “larger” server with higher performance later (see Servers > “Rescale”). Downgrading works only if you have rescaled “CPU and RAM only”, so the storage does not have to be downsized.
Create new user
- Web GUI: Hetzner > Cloud GUI > Servers > YourServerName > Rescue > Reset root password
- Web GUI: Hetzner > Cloud GUI > Servers > YourServerName > Start “Console” (Button “>_” )
- Console: Login as “root” and use reset root password from above
> passwd # re-set root password to a memorable password (optional)
> adduser dsuser # add user and set password
> sudo usermod -aG sudo dsuser # add to superuser group
> exitNotes:
- The remote login to the server via terminal (ssh) as “root” user is not allowed. Therefore, a new user has to be created and added to the superuser (sudo) group before being able to login remotely with
ssh dsuser@<serveripaddress>(or after domain name registration withssh dsuser@mydomain.com). - After starting the console in your browser, your keyboard layout may not be correctly identified. You can guess the keys for the few instruction (avoid umlauts and special characters!), which you will have to perform here and later switch to your local Linux terminal with correct key mappings.
Configure Firewall
The following ports have to be opened for the both the TCP and the UDP protocols
(Path in web interface: Hetzner > Cloud GUI > Servers > YourServerName > Firewalls):
- 22 (ssh), 80 (http, redirected to 443), 443 (https),
- Optional: 8080 (OPAL, http), 8443 (OPAL, https)
- Optional: 8022 (docker, ssh), 8880 (docker, http), 8843 (docker, https), 8085 (docker, R/Rock server)
Notes:
- If you cannot set the firewall in the web interface of your cloud provider you can set the firewall manually via the terminal after installing the Uncomplicated FireWall (ufw) [17].
Warning! If you access your server via ssh, you have to first allow ssh before you enable the firewall, otherwise you will lock yourself out and login via the web interface console and disable the firewall again.
Install Docker software
The installation of Docker software on Debian Linux is described elsewhere [12, section “Install from repository”]. The following core commands have to be executed ie on the cloud server after connecting to the cloud server with the ssh command.
Note: While the previous steps were performed using the web interface of the cloud provider hetzner.com, the following steps should be performed by connecting to the cloud server from your local laptop using a terminal, eg Linux terminal or MobaXterm [20] on Windows with ssh dsuser@<serveripaddress>.
> sudo apt update
> sudo apt upgrade
> sudo apt install build-essential
> sudo apt install apt-transport-https ca-certificates curl gnupg lsb-release
> sudo apt install libssl-dev zlib1g-dev libcurl4-openssl-dev
> sudo mkdir -m 0755 -p /etc/apt/keyrings
> curl -fsSL https://download.docker.com/linux/debian/gpg | sudo gpg --dearmor -o /etc/apt/keyrings/docker.gpg
> echo "deb [arch=$(dpkg --print-architecture) signed-by=/etc/apt/keyrings/docker.gpg] https://download.docker.com/linux/debian $(lsb_release -cs) stable" | sudo tee /etc/apt/sources.list.d/docker.list > /dev/null
> sudo apt update
> sudo apt upgrade
> sudo apt remove docker docker-engine docker.io containerd runc
> sudo apt install docker-ce docker-ce-cli containerd.io docker-buildx-plugin docker-compose-plugin docker-compose apparmor
> systemctl is-enabled docker; systemctl is-enabled containerd # check
> systemctl status docker containerd # check
> sudo usermod -aG docker dsuser
> sudo shutdown -r now # Remote server: restart
> ssh dsuser@<serveripaddress> # Local computer: Reconnect to server
> sudo docker run hello-world # Remote server: check docker installation (optional)
Install DataSHIELD as Docker containers
The Docker configuration file
The installation of a complete DataSHIELD software stack (including OPAL, MongoDB/MySQL, R) can be performed using a slightly adapted Docker configuration script [11]. You can download and unzip the Docker configuration script docker-compose.yml [Download] on the cloud server as follows:
> sudo apt install zip unzip
> cd ~; mkdir -p ./datashield/docker/
> cd ./datashield/docker/
> wget https://wilmarigl.de/wp-content/uploads/2023/02/docker-compose.yml_.zip
> unzip docker-compose.yml_.zip
> pico ~/datashield/docker/docker-compose.yml # change passwords
docker-compose.yml
version: '3'
services:
  opal:
    image: obiba/opal:latest
    ports:
      - "8843:8443"
      - "8880:8080"
    links:
      - rock
      - mongo
      - mysqldata
    environment:
      - JAVA_OPTS=-Xms1G -Xmx8G -XX:+UseG1GC
      - OPAL_ADMINISTRATOR_PASSWORD=password
      - MONGO_HOST=mongo
      - MONGO_PORT=27017
      - MYSQLDATA_HOST=mysqldata
      - MYSQLDATA_USER=opal
      - MYSQLDATA_PASSWORD=password
      - ROCK_HOSTS=rock:8085
    volumes:
      - /home/dsuser/opal:/srv
  mongo:
    image: mongo:4.2
  mysqldata:
    image: mysql:5
    environment:
      - MYSQL_DATABASE=opal
      - MYSQL_ROOT_PASSWORD=password
      - MYSQL_USER=opal
      - MYSQL_PASSWORD=password
  rock:
    image: datashield/rock-base:latest
Notes:
- Passwords (Red marked text):
- Define your own passwords (at least 16 characters recommended).
- Define only admin password at startup:
You should change (at least) the OPAL_ADMINISTRATOR_PASSWORD in thedocker-compose.ymlfile BEFORE you start the Docker containers with the followingdocker-composecommand below. Otherwise anybody with access to these trivial credentials will have access to your OPAL datasite and all individual participant data. - You may leave the default passwords for MYSQLDATA_PASSWORD, MYSQL_ROOT_PASSWORD, MYSQL_PASSWORD unchanged so the DataSHIELD system runs without further configurations. The port to the MySQL database in the Docker container has not been opened and, therefore, MySQL is not exposed to the outside world.
- Define all passwords at startup:
For additional security, passwords should not be explicitly defined in the docker compose’s YAML file. Instead one should define the password as environment variables in an.envfile. Further documentation is available elsewhere [25]. - Update passwords inside a running Docker container & in OPAL GUI:
It is more difficult to change the OPAL administrator (or the other passwords set in the yml file) in a running docker container. So shutting down the docker containers, changing the passwords in the yml config and restarting the docker containers maybe easier than login into the docker container and changing the passwords there. If you passionately want to change passwords after a container has been started, ie in the respective container, you need to update the passwords for the affected systems (eg MySQL) in Opal . Further documentation is available elsewhere [26, 27]. - Personal access tokens:
For additional security, it is highly recommended to use personal access tokens to authenticate from a script [23].
- Other configs (Orange marked text):
- These parts were modified from the original Docker configuration file [1]:
- “– /home/dockerusr/opal:/srv“: The /srv folder in the Docker container is mapped to the “/home/dockerusr/opal” folder on the host system. Note that the “/tmp/” folder on the host system is not recommended (only for tests), because contents will be clear when the server is restarted. You can show the mapping of docker folders to host folders using the
findmntcommand after login into a Docker container (see Useful Docker commands).
- MySQL and MongoDB are alternative database solutions, ie one is sufficient for DataSHIELD. Here, both are integrated into the Docker image and MySQL was given as the default. However, at present Mongo is supposed to be the more versatile database solution.
Install Docker Images
The following commands install the DataSHIELD Docker image:
Warning! You should change (at least) the OPAL_ADMINISTRATOR_PASSWORD in the docker-compose.yml file now BEFORE you start the Docker containers with the following docker-compose command below. Otherwise anybody with access to these trivial credentials will have access to your OPAL data site and all individual participant data.
> sudo docker-compose -f docker-compose.yml up -dCheck whether the Docker containers are running:
> sudo docker ps -aDeinstall Docker images
If one wants to (re)start with a clean Docker image installation (if something went wrong), the following steps have to be performed to remove an existing DataSHIELD Docker installation:
- List the processes:
> sudo docker ps -a - Stop the process:
> sudo docker stop <containerid> - Remove the container:
> sudo docker rm <containerid> - Remove the image file:
> sudo docker rmi <imageid> - Remove the permanent data:
> sudo rm -R /home/dsuser/opal/*
Steps 1 and 2 can be combined by the command:
> sudo docker-compose -f docker-compose.yml down -dUseful Docker commands
List Docker containers (incl IDs) and status of processes:
> sudo docker ps -aRun a terminal inside (!) a Docker container (e.g. to install and editor and edit a configuration file):
> docker exec -u 0 -it <containerid> /bin/bashRegister Domain
You should now register a domain, eg mydomain.com and subdomains srv1.mydomain.com and srv2.mydomain.com, at a domain name provider. You can use hetzner.com to keep all your contracts in the hands of one provider, however, the user interface at hetzner.com is more complicated and prices are more expensive than namecheap.com, so namecheap.com is my recommendation.
Figure 3 below shows a screenshot of the namecheap.com > Domain List > fedana.cloud > Manage > Advanced DNS website giving an example how to defined the DNS settings. Host = “@” refers to the main domain, here: fedana.cloud. “Host” = srv1 and srv2 define the subdomains, ie srv1.fedana.cloud and srv2.fedana.cloud. “Value” gives the IP addresses which the (sub)domain names target. Use “Type A” records, also of subdomains, to target IP addresses of your choice which do not have to be same as the IP address of the main domain.
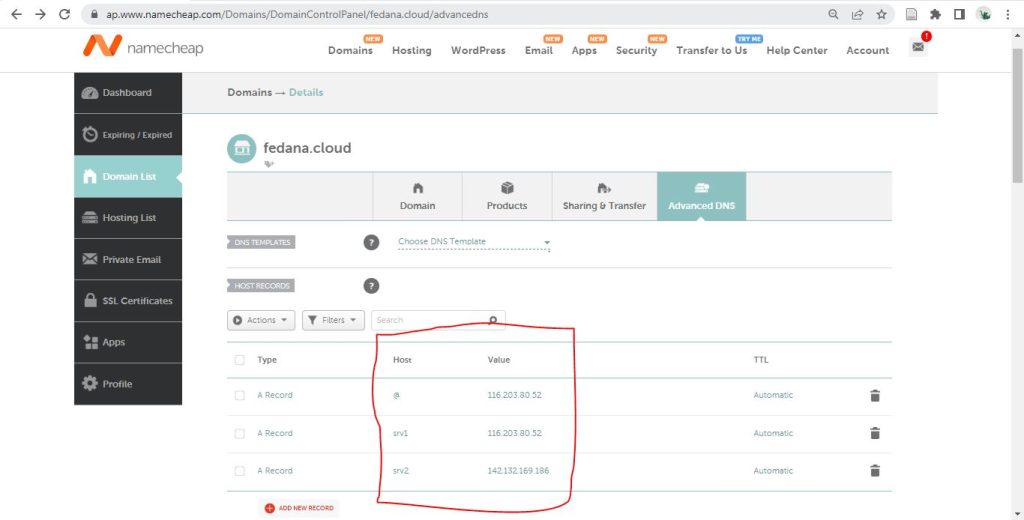
Figure 3: Configuration page of the domain names at provider namecheap.com
Install Webserver
After registering a domain name and pointing it to the IP address of the cloud server, a certificate to confirm the domain name has to be created and web server configured accordingly, because OPAL allows only a secure connection (via https) and in addition protects against Cross-Site Request Forgery (CSRF) [14].
Install NGINX web server
> sudo apt install nginx certbot python3-certbot-nginxMore information on the installation of an NGINX web server is found elsewhere [13].
Create certificate
Create a certificate for the domain name and any subdomains:
> sudo certbot --nginx --cert-name mydomain.com -d srv1.mydomain.comMore information on using the certbot tool is found elsewhere [21].
Configure web server
To be able to connect to the web admin page of the OPAL server, the reverse proxy server needs to be configured in the file /etc/nginx/sites-available/default . Go to the server {} section which contains server_name mydomain.com and edit the location / {} section as follows (Note! Make a backup copy of your default file as default.backup to another folder so you can go back to the default file if something goes wrong) :
> sudo pico /etc/nginx/sites-available/defaultUpdate the NGINX default file as follows:
location / {
    proxy_pass http://127.0.0.1:8880/;
    proxy_set_header Host $host;
}
Then the updated NGINX configuration needs to be checked and reloaded into the web server:
> sudo nginx -t
> sudo systemctl reload nginx
You can run the below scripts from any computer with an R installation. You can connect to any DataSHIELD data sites (OPAL servers) for which you have the credentials for.
Install R packages
You have to install the R packages of the DataSHIELD software on the client (ie the analyst’s computer) and the server (ie the computer of the data owner) [see 28]. Please note that some of the packages require the installation of packages in your operating system, e.g. curl, ssl [see 29].
Installation on client (ie the computer of the analyst):
# Install all DataSHIELD packages
install.packages('dsBaseClient', repos=c(getOption('repos'), 'http://cran.datashield.org'), dependencies=TRUE)

# Install DataSHIELD/Opal integration packages
install.packages('DSOpal', dependencies=TRUE)
install.packages('resourcer', dependencies=TRUE)
Installation on the server (ie the computer of the data owner, admins only):
# Login in Opal
library(opalr)
o <- opal.login('dsadmin', 'password', 'https://opal.example.org')

# Install all DataSHIELD packages and dependencies on R server
dsadmin.install_package(o, 'dsBase')
install.packages('resourcer', dependencies=TRUE)

# Logout from Opal
opal.logout(o)
Install R resources for data access
The basic data management capability of the OPAL server is limited and will not allow the import and analysis of larger datasets (e.g. 100,000 x 10 observations). Therefore, indirect access to data as “resource” is recommended. This indirect data access is implemented in the R/resourcer package [see 30-34].
After the resourcer package has already been installed in the previous section, only the configuration will be installed below.
There are multiple ways of providing data access, for example, as a local data file on the remote server or as SQL database (MariaDB/MySQL, Mongo, Postgres). Here, the simplest approach as local R Data file is provided:
- Install <resourcer> package on the client and all (!) data servers (see above)
- Export data files to .RData (.rda) data file on local computer
save(my.data.frame, file="/path/to/project/folder/mydata.rda") - Create data folder on all data servers:
mkdir -p /home/dsuser/rock/data/ - Transfer data from local computer to data servers
scp /path/to/project/folder/mydata.rda dsuser@<remotedatasserver>:/home/dsuser/rock/data/ - Update Docker configuration file docker-compose.yml
...
  rock: image: datashield/rock-base:latest
    volumes:
- /home/dsuser/rock/:/srv - Restart Docker server
sudo docker-compose -f docker-compose.yml up -d - Declare resource to OPAL server
OPAL GUI > Projects > c19vxcfs > Resources > Add resource
Category:local, Type:R Data file - local, Path:/srv/data/mydata.rda, R object class:data.frame - Create OPAL user “dsuser”:
OPAL GUI > Administration > Users and Groups > Add User - Add dsuser to Resources permissions:
OPAL GUI > Projects > c19vxcfs > Resources > <nameofresource> > Permissions > Add Permissions - Run code in R on local computer by analyst:
#########################################################################
### DataShield - Project Demo - Data Analysi (using indirect data access via resources)
#########################################################################

# Load libraries
library(DSI)
library(DSOpal)
library(dsBaseClient)

# Connect to server
builder <- DSI::newDSLoginBuilder()
builder$append(server="server1", url="https://opal-demo.obiba.org",  user="dsuser", password="P@ssw0rd")
builder$append(server="server2", url="https://opal-demo.obiba.org",  user="dsuser", password="P@ssw0rd")
logindata <- builder$build()
connections <- datashield.login(logins=logindata)

# Check datashield
datashield.pkg_status(connections)

# Assign resource
datashield.resources(connections)
datashield.assign.resource(conns=connections, symbol = "res", resource="Demo.CNSIM1")
datashield.assign.expr(conns=connections, symbol = "exp", expr=quote(as.resource.data.frame(res, strict = TRUE)))

# Analyse data
ds.colnames(x='exp', datasources = connections)
ds.dim(x = 'exp', datasources = connections)
ds.mean(rvar = 'exp$LAB_HDL', datasources = connections)

# Logout
datashield.logout(connections, save = NULL)
Data Analysis
Note! Until you have installed your own FA servers, you can use the demo server https://opal-demo.obiba.org of the OBiBa project [17, 24] to test run the scripts. The demo server is rebuild daily.
A comprehensive Beginner’s tutorial for DataSHIELD is available elsewhere [18]. The updated R code is available here [Download]:
Import Data
The below script accesses the data server as the OPAL administrator to upload data. This is an administrative task which the data owner (ie local data processor as tasked by the local data controller/principal investigator) has to perform either via R programming (see below) or via the OPAL web page (graphical user interface). More documentation on importing data is available elsewhere [22].
Warning! The access information of an OPAL administrator of a data site gives access to the complete individual participant data and should NOT be shared, esp not with analysts running federated analysis. The script is only given for educational purposes here, to show how to upload data to a server (while avoiding lots of screenshots of the OPAL web interface).
Note! The datasets which contain different sets of subjects with the same variables (ie, horizontally partitioned data) on different servers have to have the same project and file names to perform federated analysis. One can described the differences between datasets between servers in the server names and labels, e.g. CountryOne.
#########################################################################
### DataShield - Project Demo - Data Import
#########################################################################

install.packages(c("opalr", "DSLite"))
library(opalr)  # connect to OPAL site as site administrator
library(DSLite) # use demo dataset CNSIM1

# Connect to DataSHIELD/OPAL server
con.opal  <- opal.login(username = "administrator",
                        password = "password",
                        url = "https://opal-demo.obiba.org")

# Create Demo Project
opal.project_create(con.opal, "Demo", database = TRUE)
opal.projects(con.opal)

# Read Demo Data (from DSLite package)
data ("CNSIM1")
head(CNSIM1)
?CNSIM1
data$id <- rownames(data)

# Save Demo Data (to OPAL server)
opal.table_save(con.opal, data, project = "Demo", table = "CNSIM1", id.name = "id")

# Disconnect from DataSHIELD/OPAL server
opal.logout(con.opal)
Analyze Data
The R script below uses the pre-configured analyst account “dsuser” to perform a Federated Analysis on the OPAL demo server( https://opal-demo.obiba.org). To access the system, conventional credentials with username-and-password combination are used in this demo for simplicity.
In a production system, the OPAL web interface has to be used to create standard analyst accounts and user-specific (start) passwords to give access to the OPAL data warehouse via federated analysis, but no access to individual participant data (!). For additional security, it is highly recommended to use personal access tokens to authenticate from a script [23]. In a production system, only the data owner (ie local data processor as tasked by the data controller/principal investigator) should have access to the OPAL “administrator” credentials!
Warning! The “administrator” account, which gives access to the full server and individual participant data, MUST NOT BE USED for Federated Analysis.
#########################################################################
### DataShield - Project Demo - Data Analysis
#########################################################################

# Install all DataSHIELD packages
install.packages('dsBaseClient', repos=c(getOption('repos'), 'http://cran.datashield.org'), dependencies=TRUE)

# Install DataSHIELD/Opal integration packages
install.packages('DSOpal', dependencies=TRUE)

## Load libraries

library(DSI)
library(DSOpal)
library(dsBaseClient)

## Connect to DataSHIELD/OPAL server
builder <- DSI::newDSLoginBuilder()

## Connect to server 1
## IN REAL PROJECT, UPDATE URL, USER, PASSWORD FOR DATA SERVER 2!
builder$append(server = "server1", url = "https://opal-demo.obiba.org",
               user="dsuser", # Create new user in OPAL web interface!
               password="P@ssw0rd"   # Set new user password in OPAL web interface!
)

## Connect to server 2
## REUSING DEMO SERVER AS SERVER 2
## IN REAL PROJECT, UPDATE URL, USER, PASSWORD FOR DATA SERVER 2!
builder$append(server = "server2", url = "https://opal-demo.obiba.org/",
               user="dsuser", # Create new user in OPAL web interface!
               password="P@ssw0rd"   # Set new user password in OPAL web interface!
)
logindata <- builder$build()

connections <- datashield.login(logins=logindata)

# Show connections
datashield.pkg_status(connections)

# Show DataSHIELD functions
datashield.methods(connections, type = "aggregate")

# Assign remote data table to local object for easy access
datashield.assign.table(connections, symbol = "CNSIM1", table = c("CNSIM.CNSIM1"))

# Analyse Data
ds.dim(x = 'CNSIM1', datasources = connections)
ds.mean(x='CNSIM1$LAB_HDL', datasources = connections)

# Logout
datashield.logout(connections, save = NULL)
Acknowledgments
Stuart Wheater (@swheater) and Yannick Macron (yannick) on the DataSHIELD Forum (https://datashield.discourse.group) have patiently replied to my questions, proposed great solutions and pointed me to the right places in the documentation. They also commented on a first draft of the tutorial. All errors remain my responsibility.
References
[1] Gedeborg, R., Igl, W., Svennblad, B., Wilén, P., Delcoigne, B., Michaëlsson, K., Ljung, R., & Feltelius, N. (2022). Federated analyses of multiple data sources in drug safety studies. Pharmacoepidemiology and Drug Safety. https://doi.org/10.1002/pds.5587, Supporting Information (Original Technical Reports, .zip): https://tinyurl.com/bwb75efu
[2] https://datashield.org
[3] https://www.obiba.org
[4] https://opaldoc.obiba.org/en/latest/
[5] https://datashield.discourse.group
[6] https://www.docker.com
[7] https://en.wikipedia.org/wiki/Docker_(software)
[8] https://www.puppet.com
[9] https://en.wikipedia.org/wiki/Infrastructure_as_code
[10] https://datashield.discourse.group/t/how-to-install-multi-server-datashield-architecture-from-scratch/521/2
[11] https://opaldoc.obiba.org/en/latest/admin/installation.html#docker-image-installation
[12] https://docs.docker.com/engine/install/debian/
[13] https://www.howtoforge.com/how-to-install-nginx-on-debian-11/?utm_content=cmp-true
[14] https://en.wikipedia.org/wiki/Cross-site_request_forgery
[15] https://www.eucanconnect.eu/coral-docker-stack-deployment/
[16] https://coral.inesctec.pt/deployment/
[17] https://opal-demo.obiba.org
[18] https://data2knowledge.atlassian.net/wiki/spaces/DSDEV/pages/931069953/Beginners+Tutorial+DataSHIELD+v6.1
[19] https://www.digitalocean.com/community/tutorials/how-to-set-up-a-firewall-with-ufw-on-debian-10
[20] https://mobaxterm.mobatek.net
[21] https://certbot.eff.org
[22] https://opaldoc.obiba.org/en/latest/cookbook/import-data.html
[23] https://opaldoc.obiba.org/en/latest/cookbook/r-datashield/authz.html
[24] https://www.obiba.org/pages/products/opal/#demo
[25] https://docs.docker.com/compose/environment-variables/
[26] https://opaldoc.obiba.org/en/latest/admin/installation.html#docker-image-installation
[27] https://rockdoc.obiba.org/en/latest/admin/installation.html#docker-image-installation
[28] http://cran.datashield.org
[29] https://github.com/obiba/resourcer/blob/master/inst/system/install-system-requirements-ubuntu18.sh
[30] https://opaldoc.obiba.org/en/latest/cookbook/import-data/resources.html
[31] https://cran.r-project.org/web/packages/resourcer/index.html
[32] https://cran.r-project.org/web/packages/resourcer/vignettes/resources-introduction.html
[33] https://github.com/cran/resourcer
[34] https://isglobal-brge.github.io/resource_bookdown/resources.html
[35] https://owkin.com/substra
[36] https://github.com/Substra/substra
[37] https://www.opensafely.org
[38] https://distributedlearning.ai